Making the virtual visual in the physical.
While using/playing with honeypots over the
years always has been fun, at some point they lose my interest until weeks,
months later I am curious again about something and set up what is
needed.
.JPEG)
In the past that could be a hassle sometimes but
for the last 4-5 years I have been using "T-POT" off and on, which is
a whole collection of 35+ different honeypots that run in docker containers and
send their data into the ELK stack so that you can create a nice dashboard of
your pots.
I think that most of us know the fancy
"Attack Maps" that are available on the big bad internet, which show
attacks (Pews! ;) ) on honeypots around the world and where you can see an
animation where the attack comes from and to what destination it goes. My
favorite one once was the NORSE attack map but that one sadly disappeared.
Here is one from Telekom Security for
instance: https://www.sicherheitstacho.eu/start/main

Others that look okay are digitalattackmap, Kaspersky's cybermap or Fortinet's threat map.
Anyway. Such maps are cool and all that, I like fancy maps and dashboards with colors and the maps with animated attacks. But for some years I have been planning to create a physical map (like, something you can hang on a wall or something) where this similar behavior is shown, just not on a digital map but with a physical one with LEDs!
After redeploying my
honeypot a few months ago, the idea came to the surface again and I started to
set up a quick&dirty PoC to see if I could get this idea
going or not.

I started with a simple setup to test if it
would work by setting up a netcat listener which would tail out /dev/random to
a specified port. From one of my other devices, I connected to the port with
netcat and the data arrived as expected.
Continuing on that, I created a small python
script that acts as a TCP client, connects to a port and IP specified and
listens for data coming in. When data is arriving, it will make a led connected
to a GPIO port blink shortly. This script runs on a Raspberry Pi 1 laying
around which seemed to be a perfect candidate to use as a client.

The server would tail -f one of the log files to
send new entries to the client to be received.
Since I did not care about the full log entry,
in v3 of the PoC I changed it to send a '1' on each new attack registered in
the log it monitors.

On the Honeypot server I whitelisted my IP address to 8 ports which I selected, the RPi had to connect to these 8 ports simultaneously. As it was only for a proof of concept, I made use of Netcat, Tmux and Tail to setup the initial setup with 5 leds.
A shell script was
created that opens a new tmux session, splits it into 5 panes and run a python
script in each pane. On the TPOT honeypot, the log files and other
relevant data are saved in the /data/{HONEYPOTNAME}/ directory, these were
monitored via tail -f and send to netcat by nc -nvklp (the -k switch is to
keep the connection open when the client disconnects) when data would be
available.
That worked like a charm but now I wanted to
have a LED stand to put them in to since the breadboard configuration is just
not so great to look at.

Breadboards are handy but ugly
So I printed a holder to do the job. The print
was not fantastic because of the printer not being used for some time but I did
not mind that since it is just for a PoC and would be fit for purpose.
These are the different
iterations of the PoC:
v0.0 breadboard concept
v1.0 "traffic light" 5 LED kind of setup (tinkercad 3d model)
v2.0 "PEW" display 8 LED setup (tinkercad 3d model)
v3.0 "Baddy Detector" 16 LED setup (tinkercad 3d model)


.JPEG)
Version2 basically is an
upgrade of version 1, I just added more leds to it (8) and printed another
holder for it. Aaand since I didn't like it enough, I created another one, v3,
which would hold 16 leds. The leds are paired so they still only are used for
flashing on 8 ports/logs on the server end.
.JPEG)
In version3 I converted the
bash shell scripts into python scripts, which makes it a lot more user friendly
and somewhat less resource intense. In this version the python script on the
Raspberry connects to all 8 ports which are configured and will flash the leds
when a "1" is received from the server.

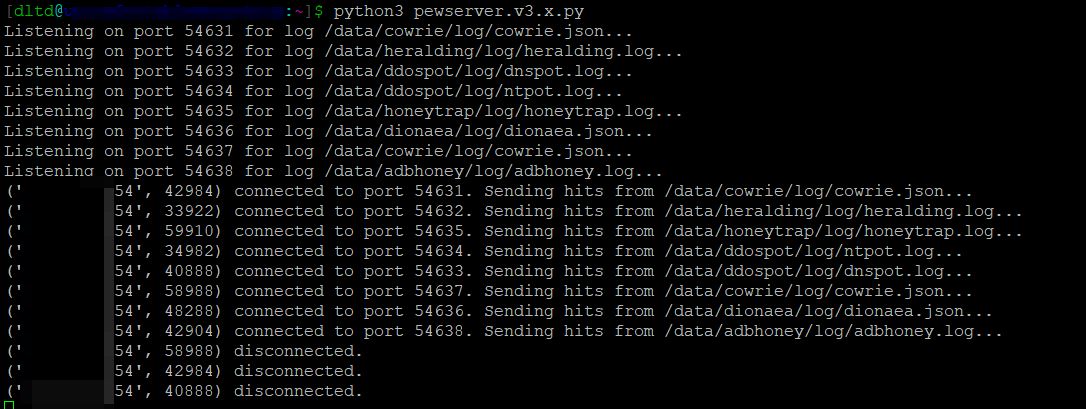
The server listens on these 8
ports and, using a 'tail' like function, monitors the log files it is assigned
to monitor and sends a 1 to the corresponding port when activity is detected.
One of the logs is monitored twice (Cowrie) where the second one will monitor
for activity on the honeypot, i.e. commands bying typed in a shell by a bot or
a person.
The LEDs are put in a specific
order and in pairs, like so:
2 3 4 5 6 7 8
1
1
8 7 6 5 4 3 2
This also led to making a
'startup' animation of the leds, so you can see they all are working and it
just looks nice to have something happen when the script is started.
The silly thing about all of
this is that I only needed v1 to do my PoC and have something to use for the
larger project which one day will start, but I enjoyed working on it too much
so now 3 versions exist. And maybe there will come another one that has a
digital display added to it to display the country name or something like that.
To be continued, I'd say :)
I have published all files on
github and have added comments in the differents scripts on what they do or how
it works, feel free to look around there.

I also created a few scripts to check for dead leds, which you can find here as well. This can be handy for troubleshooting connections or the code.
That was it for now. The larger project where the PoC is for might take some time but once it is done I'm sure it will look great.
PoC v3

PoC v2

PoC v1

Some additional pics
.JPEG)
.JPEG)
.JPEG)
.JPEG)
.JPEG)
